Request & Response 3.0.0
It's important to understand the lifecycle of your application to be able to understand how and when things are accessible to you and for more advanced uses, like REST for example.
This is a full request lifecycle
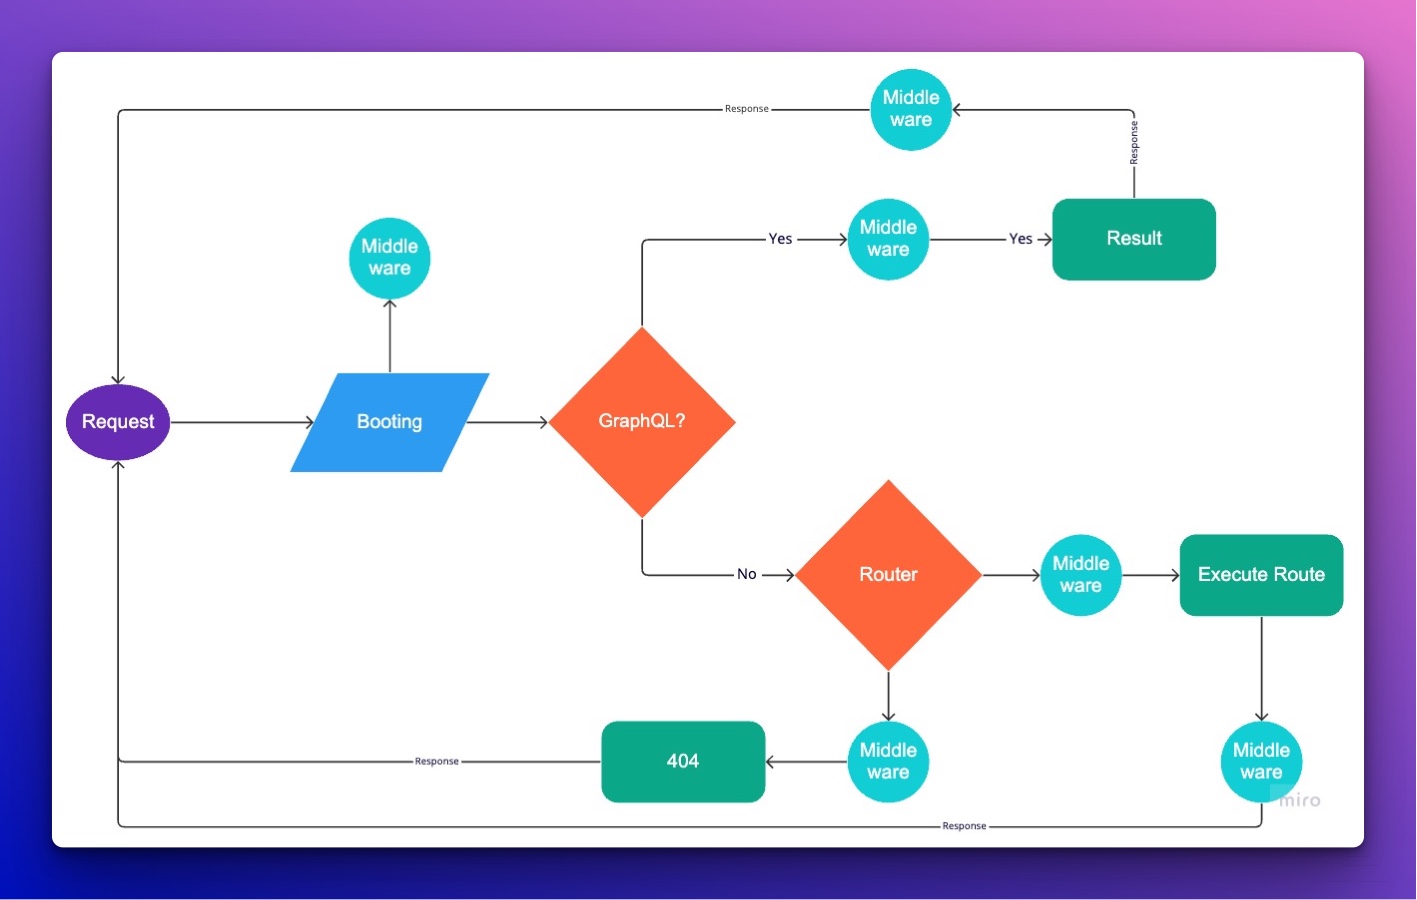
Every call that returns a response to the requester is Response Object and can be manipulated by a middleware prior to being returned to the requester. See the Middlewares section for more details about this concept.
Request Class
The request class is very useful when you need information about the request that you are dealing with. It provides you with things like user ip, used http method, user agent, active user (if logged in), headers and more.
User Input
The request class is also responsible for an input coming from the users. It's where you would get the data for GET, POST and PUT requests. The request class will handle sanitization of the data so your app can remain secure and default value in case the value is not set for the piece of data you are looking for.
Here are 2 examples of getting a POST value. Example 1 is the safe way to do it, Example 2 skips the sanitizing process.
// Safe
$thing1 = $this->request->post('my_thing1', false, 'default_value');

// Unsafe
$thing2 = $this->request->post('my_thing2', true, 'default_value');
User
Many times in your application, you will need to know if the requesting user is an authenticated user. The request class offers 2 methods to valid if a user is logged in. user and isLoggedIn will do this for you. user will return the active user if available while isLoggedIn will tell you a yes or no answer to that question.
Headers
The request class can help you get or validate headers from the request. It can give you the headers, give you a specific header value or validate if the header is present and not empty.
HTML Response
Providing an HTML response enables you to output an HTML template with Twig. Twig is a leading templating engine that keeps templates clean and simple to understand. SailCMS provides many helpers and tools to simplify Twig templates. For more details about templates and Twig, see the Twig section.
By default, every AppController instance has a response property set to output html. We recommend using this free instance of response for your page. This is an example of using this use case:
public function yourCall(): void
{
    $this->response->set('key', $value);
    $this->response->template = 'yourpage';
}
as opposed to
public function yourCall(): void
{
    $response = Response::html();
    $response->set('key', $value);
    $response->template = 'yourpage';
    $this->response = $response;
}
The difference here is more code for no reason and extra instance of response being created for no valid reason. If you still prefer working the static way, read the following:
To prepare a response for html output, you can use the convenience method html:
$response = Response::html();
To add variables to a template from your controller, you can call the set method on the response, like the following:
$response->set('key', $value);
In your template, you can display the value using Twig's syntax: {{ key }}.
To set what template to render, you only need to provide its name without the extension. For example, to load the homepage.twig file in your templates/project/ directory. Simply provide homepage the rendering engine will do the rest.
$response->template = 'homepage';
When your method is done, just return the response object, the system will do the job of rendering your template to the browser.
JSON/API Response
To return a JSON response, simply use the convenience method json from the response object:
$response = Response::json();
To set content to the response, you can do just like the HTML response, set key value pairs within the response object using the following:
$response->set('key', $value);
Then just return the response object and the system will output your json string and set the return content type to application/json for you.
Dev Mode
When in Dev mode, Sail will output your JSON in a human readable format to help with debugging. When in production mode this is automatically turned off performance sake.
Secure JSON
If you need it, you can ask that your json be encrypted before output. You are responsible for having the necessary items to decrypt on the other side. For transport purposes, the encrypted output is encoded with Base64. See Security section for more details.
$response->secure = true;
CSV Response
If you would like to return a CSV file to the browser (in case of an exporting feature of some sort), you can simply use the convenience method csv from the response object.
$response = Response::csv();
To set content for your csv its a bit different than HTML and JSON. You need to use the setColumns and addRow or addRows methods:
$response->setColumns(['name', 'email']);

// Add a single row
$response->addRow(['John Smith', '[email protected]']);

// Add many rows at once
$response->addRows([
    ['John Smith', '[email protected]'],
    ['Jane Smith', '[email protected]']
]);
Important Note: This output method does not validate your column count. If you provide less columns in your rows than in your columns, nothing will fill up the missing columns.
To output your csv, simply return the response object and the system will return your csv and set the return content type to text/csv.
Secure CSV
If you need it, you can ask that your csv be encrypted before output. You are responsible for having the necessary items to decrypt on the other side. For transport purposes, the encrypted output is encoded with Base64. See Security section for more details.
$response->secure = true;